
Build Your Own Bong: The 3 Most Popular DIY Guides (2026)

Weed Wissen
- The smartest shortcut: your bong in 60 seconds
- IMPORTANT: before you start, the material safety check
- Guide 1: the classic, building a bottle bong
- Guides 2 & 3: creative DIY alternatives
- Avoiding common mistakes: your troubleshooting
- FAQ: your questions, our answers
- Conclusion: creative DIY or a smart & safe solution?
No bong to hand, but you're in the mood for a relaxed session? A familiar dilemma. But before you start rummaging randomly through the kitchen drawer, let's pause for a second. Building your own bong is easier than you think, but there's a smart way and a potentially risky one.
This guide shows you both: the clever shortcut for a perfect session in 60 seconds and the classic DIY routes, like the legendary bottle bong. The crucial difference? We put the focus 100% on your safety and show you how to avoid typical mistakes that not only ruin the flavour but can also be unhealthy.
The smartest shortcut: your bong in 60 seconds with the Uni-Bong Maker
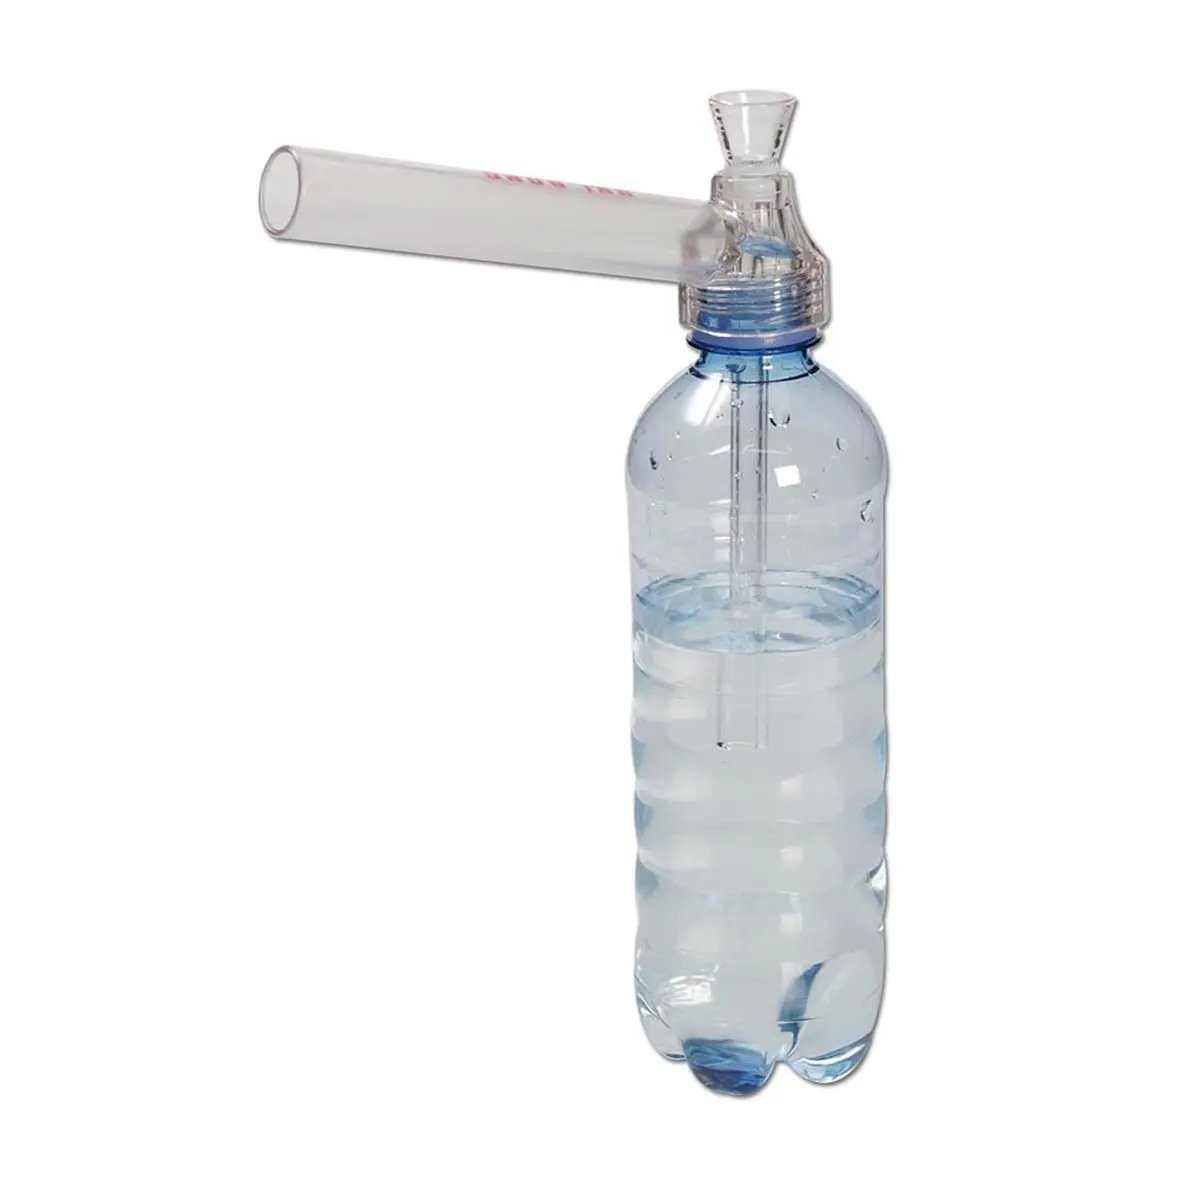
Honestly: if it needs to be fast, clean and absolutely safe, there's no way around this solution. The Uni-Bong Maker is a simple but brilliant adapter that turns any standard PET or glass bottle into a fully working bong. No drilling, no gluing, no improvised bowl, just screw it on and go.

Your benefits at a glance:
- ✅ Maximum safety: no contact with heated plastic or aluminium foil. The chillum is metal, the bowl is glass.
- ✅ Extremely fast: you literally need just a minute from unpacking to the first hit.
- ✅ Totally discreet: the small adapter fits in any pocket and a water bottle draws no attention.
- ✅ Reusable again and again: easy to clean and made for countless sessions.
- ✅ Pure flavour: glass and metal guarantee an untainted aroma.
If you want to skip the DIY effort and get straight to the enjoyable part, this is the cleverest choice.
➡️ Get the Uni-Bong Maker
IMPORTANT: before you start, the material safety check
This section is the most important of the whole article. Many guides online recommend materials that can release toxic fumes when heated. Please do yourself a favour and skim this table before you bring a lighter anywhere near your DIY bong. Your lungs will thank you.
| Component | ✅ Suitable materials | ❌ Absolutely avoid! (Reason) |
|---|---|---|
| Body | PET bottle (cold water only!), glass bottle, sturdy fruit/veg (e.g. apple, melon) | Thin yoghurt pots, coated cans, unknown plastics (can melt/release fumes) |
| Chillum | Metal tube (e.g. the barrel of a metal ballpoint pen), glass tube | Plastic straws, plastic ballpoint pens, aluminium foil (melt, release harmful substances) |
| Bowl | Glass/metal bowl, metal screen, or a socket bit from the toolbox in a pinch | Aluminium foil (can release particles and gases when heated), plastic caps (highly toxic!) |
💡 In short: the golden rule when building a bong
Anything heated directly (that means the bowl and the upper end of the chillum) must NEVER be made of plastic, aluminium foil or coated metal. Always reach for glass or untreated metal here.
Guide 1: the classic, building a bottle bong
The bottle bong is the granddaddy of all DIY projects. With the right materials and a little finesse, you can build a working smoking device in a few minutes.
What you need (the safe version)
- A sturdy PET bottle (approx. 0.5 - 1 litre)
- A metal tube as a chillum (e.g. the empty barrel of a metal ballpoint pen)
- A small bowl or a metal screen (e.g. from a tap aerator or an unused pipe screen)
- A lighter and a sturdy needle or a small screwdriver
- Sealing material (e.g. chewing gum or strong tape)

The homemade bottle bong in 5 steps
- Make the chillum hole: hold your metal tube at an angle against the bottle, about a third of the way up. Heat the tip of the needle or screwdriver and carefully make a hole just big enough for the tube to pass through.
- Insert & seal the chillum: push the tube through the hole so it points diagonally downward and its lower end sits about 2-3 cm above the bottom of the bottle. Seal the spot carefully from the outside with chewing gum or tape. No air must escape!
- Kick hole (optional): on the opposite side, just above the level of the lower chillum end, you can make a smaller hole as a kick hole the same way.
- Fit the bowl: place your screen in the upper, outer end of the metal tube. If you use a socket bit, it can often be pushed straight onto the tube.
- Add water: pour in enough cold water so the chillum end sits 2-3 cm below the surface. Test for tightness: cover all openings and pull on the mouthpiece. A strong vacuum should build.
Pros and cons of the bottle bong
- ✅ Quick to build, materials available almost everywhere, the DIY factor is fun.
- ❌ Often not 100% airtight, not ideal on flavour, only suitable for short-term use, cleaning is virtually impossible.
Guides 2 & 3: creative DIY alternatives for any occasion
If no bottle is to hand or you just fancy trying something different, Mother Nature has a few options ready.
The apple bong: the quick bio-hack for parties
The ultimate party gag and completely biodegradable. All you need is an apple and a pen or similar pointed object.

- Remove the apple's stalk. Using the pen, bore a hole straight down from the top to about the middle of the apple.
- Now bore a second hole from the side that meets the first. That's your smoke channel.
- The top hole serves as the bowl. You can hollow it out a little and insert a small metal screen for better hold. And there you have it, probably the fruitiest pipe in the world.
The bucket bong (gravity bong): the guide for advanced users
The bucket bong, also called a gravity bong, is not for beginners. Using water pressure, it produces extremely dense smoke with a very intense effect. Building it is a bit more involved and requires a cut-off bottle and a bucket. Since this device is in a league of its own, we've dedicated a separate, detailed guide to it.

➡️ To the detailed guide: Everything you need to know about the bucket method
💡 Nice to know: the flavour difference
Why does a glass bong taste better? Simple: glass is completely flavour-neutral. Plastic, on the other hand, can impart subtle notes to the water and smoke even when it isn't heated. For pure, untainted enjoyment, glass or a clean DIY solution like the Uni-Bong Maker is always the first choice.
Avoiding common mistakes: your troubleshooting for the perfect hit
The first homemade bong is rarely perfect. When something doesn't work, it's usually down to one of these three slip-ups. Here are the quick fixes.
-
Problem: "My bong leaks and pulls in side air."
Fix: this is the most common mistake. The join between chillum and bottle is the weak point. Check your seal and use too much rather than too little tape or chewing gum. Tighten everything up again and repeat the vacuum test. -
Problem: "Water keeps splashing into my mouth (splashback)."
Fix: you've added too much water. The rule of thumb: the chillum should sit only 2-3 centimetres deep in the water. Tip some out and try again. Also draw a bit more slowly and evenly. -
Problem: "The smoke is harsh or tastes of plastic."
Fix: this can have two causes. Either your chillum or bowl is made of an unsuitable plastic (see the safety table!). Or the flame of your lighter gets too close to the PET bottle. Always hold the flame directly over the bowl only.
Not keen on sticky fingers and hunting for the right little tube? If you'd rather save yourself the hassle and want a solution that works perfectly straight away, take a look in our shop. There you'll find a huge selection of bongs for absolutely any budget, from the affordable entry model to the high-end device.
➡️ Get the perfect bong for exactly your needs!
FAQ: your questions, our answers on building a bong
How much water is optimal?
As a rule of thumb: the end of your chillum should sit 2-3 cm deep in the water. That ensures good cooling and filtering without water splashing up.
Do I need a kick hole?
No, it's not strictly necessary, but for many it's part of the deal. With a kick hole you can inhale all the smoke at once at the end of the draw ("kicking"). Without one, you simply pull the chillum out of the bong to achieve the same effect.
Is aluminium foil as a bowl really that bad?
Yes. Even though it's often done, experts advise against it. Heating aluminium foil directly can release tiny particles and chemical compounds you don't want to inhale. Building a bong without aluminium foil is always the better and healthier choice.
What's the best way to clean a DIY bong?
Honestly: don't. A bottle bong is a throwaway item. Because of the glued spots and the soft material, thorough cleaning is barely possible. Use it for one session and then dispose of it in the plastic waste. Fruit bongs go in the compost.
Conclusion: creative DIY or a smart & safe solution?
Building a bong yourself can be a creative stopgap and a fun project for in between. The classic bottle bong in particular is part of every experienced smoker's basic know-how. You've seen that with the right materials and our guide, it's entirely possible to build a working device.
But if you value safety, pure flavour and a lasting, hassle-free solution, it quickly becomes clear: there's no way around a well-thought-out product like the Uni-Bong Maker. It eliminates all the risks, saves you the DIY effort and delivers a perfect result every time.
For occasional fun, DIY is great. For regular enjoyment, a smart solution is simply better.